Super Birthday Project Complete!

Last week, I bought the initial materials to make my brother’s birthday gifts. I have officially finished the project, and it is sitting at my dining room table, waiting for a box, so it can be shipped.

As I was making some finishing touches last night, I started musing on the benefits on homemade gift-giving. Apart from the obvious “it comes from the heart” bits of the homemade preference, I started wondering about cost, etc. So I am breaking that down using this project. Just as a preface, I think the homemade thing is cooler in general, and I will continue to make gifts if I can. I was just curious about this bit.

The Cost of Store-Bought

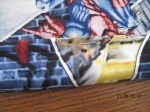
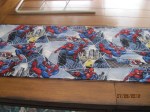
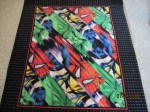
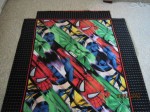
  • Spider Man Curtains with drapes and valance: combined $16 on Amazon.
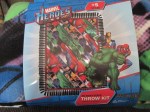
  • Marvel Fleece Throw: $14 to $30 on Amazon.
  • Comic Sound-Effects Pillow: $13 to $25 on Etsy for most similar item (smaller throw pillow).
  • DC logo wall art:  $13 per logo x 3 logos = $39, not including framing.
  • Frame for ordered art: $7 and up

Total: $89 to $130ish

The lower end is not bad, obviously. Online shopping lends itself to lower prices, but for some of the items that I made, I would have had to move into the online hand-made sellers (art prints on Etsy) or art galleries online. The cost would have come from some of the more stream-lined items that I made (pictures at the end!).

Of course, the other issue is that I would have had just clicked a few buttons to get these items, so not much care would have gone into them. Also, I would not have ended up with the extra fabric that I now can use for other projects, which brings me to…

The Cost of Hand-Made

  • 4 yards of Spider Man fabric: $30 at Joann Fabric **2 yards left over = $15 for fabric used
  • 2 yards of Sound Effects fabric: $15 at Joann Fabric **1 yard left over = $7.50 for fabric used
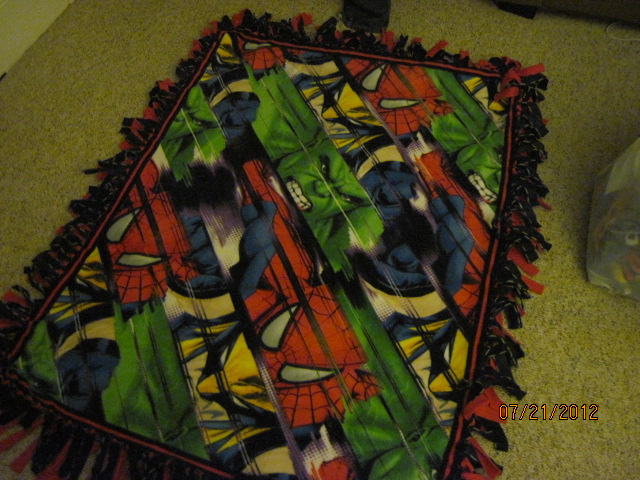
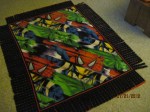
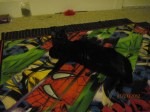
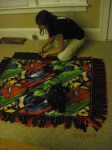
  • No-sew fleece throw w/ Marvel Heroes: $20 at Joann Fabric.
  • Polyester Filler: $3 at Joann Fabric.
  • Frame for hand-made wall art: $5.25 w/ discount at Michaels.

Total: $50.25 for used items, $78.25 total

Even without taking out the cost of the left-over materials I have, I spent less by making the gifts. If you don’t count the extra fabric, then I spent a little more than  half of the lowest cost of buying pre-made goods.

One might argue that I should calculate the cost of my time. I spent, all told, about 10 hours working on this project. In order for me to calculate the time, I need to determine what that time is worth based on what other tasks I might have been doing otherwise. The answer of course is…nothing. I love to craft. Had I not been making curtains, I would have been making something else. If anything, I would say that the added benefit of doing something I enjoyed for ten hours in one week would drive the cost down.

All told, I am happy with how most of the items came out. I hope they look good in his room.

The final bit was this:

Is that the Justice League calling?

Last night, I decided I wanted to make something that would grow up with him a bit more – something that had a little bit of a modern feel to it. I cut up some card stock into 4×6 rectangles, and since I had already sent some money toward Marvel, I thought I would show DC some love, too.

These were relatively easy to make, all things told. The hardest part was the Superman logo because I wanted to make sure the proportions were right. Nothing a ruler and protractor can’t help with, though. I also did not have my Crayola green marker, so I had to improvise and use a Vis-a-Vis wet-erase marker for the logo on the Green Lantern’s and a Sharpie for the background. It still came out okay, though. The best part? With the exception of the frame, this part of the project cost nothing. And the frame, as I noted above, I got a discount on, so it was less than $6. It came out better than I’d hoped, and I think it will make a great final touch.

So that’s it!

One week, 10 hours’ work, and $50 made my brother some nice new additions to his Super Bedroom.

Next on the docket: a tote bag.

The only gift I didn’t make – some Super Stickers!

Curtain, valance, blanket, pillow, and wall art – made by me!


Super Birthday Valance: I am too tired to write a witty title

Eric and I drove to Lake Odessa today to visit with him mom, her boyfriend, and the boyfriend’s family. It was a lovely time, and they are lovely people who live in a lovely home. They had lake access. They have a barbeque. We ate like royalty, went fishing, and enjoyed the company of some very sweet dogs.

I am surprisingly tired.

But before we left this morning, I whipped out that leftover Spider Man fabric, and I made a valance to round out the sewing for my brother’s Super Birthday Project. With the exception of the fabric being a bit uneven on the bottom when I started, this was an extremely easy part of the project.

I cut the fabric toward the bottom, so that I had three sewn edges and only had to make the loop for the curtain rod. I even managed to straighten out the fabric while I did this. All together, it took about thirty minutes. Then I cleaned up the area and put the valance with the other projects.

I have one final idea for the project, and I am going to work on that now before bed. I should be completely finished by Monday, which means it will ship in time to arrive by the special day.

I am feeling very accomplished, having sewn a curtain (despite the rather silly yardage error), a valance, a pillow, and put together a no-sew fleece throw. That means that I have added two sewing projects to my “tried it” list, and another general craft there as well.

Also before we left, I made a dish to bring with us to the get-together. Usually I make an easy tomato salad (tomatoes, cucumber, red wine vinegar, oil, and salt), but I only had one cucumber, and I wasn’t sure it would be enough. In order to make it a little less tomato heavy, I cooked up some rotini really fast, used two tomatoes to make some fresh sauce, and I added some spices to make a sort of pasta salad. It was quite tasty.

I am off to draw some stuff. Almost forgot! Here is the eye candy:

Spidey Senses

I am in full geek out mode lately, it seems. And now I have about two yards of extra Spider Man fabric.

At first, I danced with the idea of making a skirt because, well, they are easy, and I’ve done it before. What kind of blogger would I be if I only did stuff I felt comfortable with, though? I like to think that half of the fun is getting see the pictures of 135 inches of fabric splayed out on my floor because I asked for 4 yards instead of 4 feet.

So instead, I’m going the bag route.

I don’t do purses in general. I have used a grand total of 6 purses in my life time, and 6 of them were used before I really had anything worth carrying in a purse.

However, my thinking is this: I work in a craft store that required bag checks every day as we leave. Currently, I have a bag with umpteen thousand pockets, and it is kind of a pain to go through when I’m just trying to get home to craft. I need a simpler bag to bring to work that can hold my wallet, lunch, and phone with no problems. I am told these are generally called “tote bags”, so that is what I’m going for.

Most of them are made with canvas. I could go buy canvas. But I have a boatload of fabric upstairs and sitting on the dining room table, so that just seems silly.

Instead, I’ll be doing this project. FYI, it is through a website to which I am already subscribed, so it might ask you to subscribe. Suffice it to say, it’s a tote bag. And it doesn’t require canvas, thus my previous mini-rant.

In other news, I am working on a last minute bit to add to my brother’s Super Birthday Project, but I will keep it under wraps until I reach a decision. I also still have to make that valance.

Work might be getting even MORE hectic soon, but I will soldier on. So many craft projects and so little time! I apologize for this cop out post.

Also, because I don’t say it enough, thank you to all you folks who have subscribed to my blog. I spend most of my life feeling like I’m talking to myself, so it’s nice to know that at least a small handful of folks in the world are amused by my…well, trials and tribulations as well as successes. So thank you for sharing them with me, and I hope you enjoy!

Super Birthday Curtain: An exercise in patience

What a week. Sorry for no post yesterday. I was watching The Dark Knight Rises.

Today I ventured into making the curtains for the Super Hero Birthday Room Project (as I’ve taken to calling it…since now). I have two sewing books, and they both have lovely little explanations for how to sew curtains. There is also this amazing resource for crafters known as “the internet”, which has a ton of information for first-time crafts.

I used none of these.

Instead, I decided that what I needed was four hemmed edges and a hole to put a curtain rod through. This model worked fine. But because this is me, the project did not go off without a hitch.

Here is my journey through curtain making:

Step 1

I started with fabric. I bought my fabric on Saturday; this was my second choice. I went with this Spider Man fabric because the fabric I had originally chosen was nearly gone, and they did not have enough.**

Step 2

I pinned the bottom edge for the hem. I also ironed it down before I took it to the machine. Notice that I am not using my hand-made pin cushion. This is not because of any reason other than I keep forgetting about it.

Old needle = BAD

I did have the wherewithal to realize that I had sewn multiple projects on the same needle and perhaps it was time for a change. So here’s to the needle that sewed many of my first failures and successes.

4

The first side is completed!

Have you ever dropped a whole container of pins on the floor?

I did, just today. 🙂

I got wise…

At some point, I realized that I could pin and iron simultaneously. So that’s what I did. I pinned in two spots, then ironed. Then pulled the fabric up and pinned two spots, then ironed. And so on.

Making headway

Although I was sewing on the dining room table for extra room, I still found it amazing difficult to keep all of that fabric from falling off the wooden surface.

Curtain rod!

Finally, after the 2 hour Tim Burton Batman, all sides were nice and neat, and I was ready to sew the loop for the curtain rod. In order to do this, I simply placed the rod on the fabric and folded it to see where I would need to sew.

I was worried it wouldn’t be long enough

You might remember, keen reader, two asterisks earlier when I mentioned forgoing a favored fabric because there was not enough. Well, I’m afraid the joke’s on me. The day I picked up the fabric, the internet had given Eric and I the finger and taken the day off, so I did not have access to my e-mail with the window and door measurements from my mom. So I called whilst in the fabric store to get them: 40in by 44in.

Somehow, in the midst of my searching for fabric and mom trying to juggle answering my questions and guests coming into the house at that very moment, I got it in my head that I needed at least 4 yards of fabric. Obviously, I only needed one and a half.

However, I bought 4, and so here are the 135 remaining, usable inches splayed on the floor.

Now my brother is getting a curtain for the door and a valance for his window. And I will be getting a Spider Man skirt, perhaps. Or tote. I’ll still have quite a bit left over.

The curtain rod being finished

Because my brother is the best person on this planet (and I do mean that), having a plain curtain rod is not good enough for him. Luckily, I grabbed some Spider Man duck tape for my dress form project the other week, so I used that to decorate the rod. Now he has a totally Spidey curtain rod to match his curtain(s).

My awesome husband/curtain

With the curtain completed, I had to get a picture of it! Alas, at 5ft, I am too short to hang it up for a picture. In steps Eric to save the day. Thus, here is the completed curtain for the door.

I am going to do the valance tomorrow, probably, as it will take some actual skill to complete.

And when I finish whatever else I do with this fabric, I’ll be sure to post it and remind everyone of my yards of glory. Last day of work for the week tomorrow! Hooray! And then off to the lake Saturday. Even my days off seem busy. Hopefully next week, I’ll only work a few days. More craft time = a happy polymath.

In the meantime, keep it crafty.


Twofer Tuesday 2: Bean and Tomato Salad

What a day. I learned a trick to get a pick-me-up in the day that I will try tomorrow for date night.

In light of all of that, I am showcasing a salad I made last week: tomato and bean salad. The original recipe calls for it to be served a bed of tomatoes, but I just served it on a bed of spinach.

Easy to make: marinate the tomatoes and white beans in some honey, vinegar, and oil. When you’re ready, cook up your green beans, mix them up, let them cool, and then serve them on your tomatoes or spinach. It was really good, and the leftovers were also delicious.

Here’s the eye candy:

Twofer Tuesday 1: Super Birthday Pillow

I finished Part 2 of the awesome plan for my brother’s birthday room makeover on Sunday, despite its very best efforts not to be completed.

Fabric and polyester fill to make a Super pillow

I made the pillow with some very soft fleece, of which I am immensely jealous, except that I kept enough leftover to make myself some my pajama pants with it.

Fabric cut to size

For some awful reason, I decided that hand sewing the pillow was a fantastic idea. If memory serves, I had it in my mind that I could sit on the couch and watch a movie or some such. How very quaint. Alas, like so many ideas, it was a bad one. Awful, even. I forgot that sewing by hand takes a bit more time and concentration. For instance, sewing a straight line by hand is rather difficult. (Please excuse any noticeable changes in language/writing style. I am watching British TV.)

Hand sewing…what was I thinking?

In a moment of frustration, I decided to sew along the edge of a table, to ensure that the hem was straight. It worked, at the expense of my back comfort. Leaning over for such a long time was taxing. But when the pillow was stuffed, I was able to finish the hem sitting back on the couch like I had originally hoped. It was nice – all 5, maybe 10, minutes of it.

Sewing against the table edge

The point is that the pillow got done, and it looks very comic bookish. I believe it will match what mom has in mind for his furniture, so that’s a bonus.

Pillow done!

I am, for lack of a better word, exhausted. I work 5 days this week, 5am each day, and they have so far been very busy days. Even coming home involves work: updating bank info, changing insurance, cooking dinner, cleaning, laundry…it is a struggle to keep my eyes open.

Ah, but the crafts must go on.

Birthday Boy Project: Super no-sew fleece throw

Yesterday I picked up some Marvel-licensed fabrics and a no-sew fleece throw blanket for birthday present crafting. I started on these crafts last night, to ensure I have plenty of time to work on everything and get them shipped out in time for the special day.

I took up the fleece blanket first because I could do it downstairs while watching Coraline, which I scored at the dollar store for $3.50!

I knew that the blanket was n0-sew, and I knew that it would probably take some time, but I did not know how sore my back would be after leaning over for about 2 hours. The work was also repetitive and felt a little bit uninspired. Not to say that the final product was not worth it. Perhaps the saddest part is that getting the kit was cheaper than buying fabric to make a throw. With the discount we nabbed, the kit was $20; to get the same amount of fabric needed to make one of these from chosen fleece would have been closer to almost $45 for one panel.

So this project was easier on my wallet if not my fantastic whimsies.

The highlight of working on the blanket was Zoe, who upon coming downstairs when I was nearing completion, decided that the blanket was obviously there for her. She came over and plopped right down on it and didn’t move until the thing was done, and I had to pick it up to shake it off and fold it. Ah, cats.

The finished product does look great, and I would be lying if I said I wasn’t a little jealous. I should have purchased the Batman one for Eric and I. Oh well. Hindsight and all that.

Here are the pictures, from start to finish! And, yes, Zoe is included.

Miniature Magic: Nurgle Chaos Warrior

A little back story: Eric and I were up North last weekend visiting some of his friends, and we spent Sunday morning/afternoon in a game store playing Warhammer 40K. While there, we picked up some Valejo paints for historical miniatures, specifically some German WWII colors. We’ve been slowly switching from Citadel paints (made by Games Workshop) to Valejo because the Citadel paints dry out too quickly.

With these new paints in hand, a new unit of Chaos Warriors to paint for my Warhammer army, I decided to try some of the drab green colors and paint the unit devoted to Nurgle.

Here’s what I came up with:

For the armor, I did a base coat with the Olive Drab

The Valejo paints dry a lot flatter than the Citadel paints, so the color is subtle. I actually preferred that for what I was doing.

A little dry brush with German Green

I dry brushed and highlighted the armor (and shield) with German Green, which is obviously much lighter. I didn’t like how light it was when I first tried this, but the solution was easy, and this two-tone under coat makes the final color a little more realistic.

Now paint over them with Catachan Green

Catachan is a Citadel paint, but that’s alright. It’s hard to see in the picture, but with the lighter green against the olive, there are natural highlights now.

Some details getting done, now

Here’s his backside

For the cape and leather bits, I used Valejo’s chocolate brown, another flat color. Then I highlighted.

Sword done and horns fully painted

Finished!

The final touches were some white tips on the fur of his cape, the highlights on the sword, shield, and leather bits. And then I painted the puss coming out of his helmet. It’s sufficiently gross.

All together, the two that I finished yesterday were some of the best I’ve painted. As it turns out, having the right kind of paint is a real help. They took a combined 2.5 – 3 hours. Only 10 more to go, too. Oh boy.

Went to see The Amazing Spiderman today, which was fantastic. I have to be honest; we were planning on going to see that this weekend anyway, then waiting for the crowds to thin for Batman, but after what happened in Aurora, I don’t know…it’s all very surreal.

I also gathered all of the supplies for birthday gifts! I will post those as I finish them (blanket, pillow, curtains).

A “wicked” oriental salad

This week has had me dragging my heels, and this blog is suffering for it. Sorry. Again. Geez, I’ve been saying that a lot, huh? Need to get my butt in gear. The good news is that work is keeping me fairly busy, plus cooking and crafting – mostly painting – and that is why I have not been writing quite as much as, perhaps, I should be. Work will be keeping me even busier soon, since I’m taking up some temporary stuff, too. Luckily, I have a few deadlines that will have me posting some good craft stuff soon.

For now, we are sticking to the kitchen where I made an oriental salad a few days ago that I had tried at my in-laws’ house a few weekends ago. It was amazing, and I made it this week in an effort to keep healthy food on the table. This was almost the week of salads, but we had a few non-salad meals that unfortunately broke that record.

-Pause here while I watch a video of Jeremy Renner. Mmmm. –

Like many oriental salads, this one uses partially cooked ramen noodles to give it a crunch and cole slaw, though I substituted broccoli slaw. I also skipped the green onion because I forgot to buy it, and I only used one packet of seasoning instead of two to cut down on the sodium.

Little bit of vinegar, little bit of oil, sugar, and spice.

The loss of the extra packet did not make a significant difference in taste, and to compensate I used a little bit more vinegar. The broccoli slaw made it a little crunchier, and I prefer it to regular ‘slaw anyway. I toasted the almonds on the stove – burned a few, too (oops!).

Dry ingredients. Not yet -as- delicious.

I started the whole process a little later than I meant to, so dinner wasn’t quite ready when Eric got home. That also meant I lost a little soaking time – maybe an hour. But it still soaked in fairly well, and it made great leftovers!

Hey! Speaking of Jeremy Renner, there’s the article from Esquire!

I was quite pleased with the way this turned out, and I will definitely be making it again.

As I mentioned, I have another recipe to share next, for another salad, too. I painted two miniatures today, but I forgot to take the “miniature magic” pics, so I will do that next time. And one of them is probably not PG, so it won’t be making an appearance.

In the meantime, folks, keep it crafty!


Wine Bottle Mach 2: This time, it’s personal

So not long ago (read: yesterday), I mentioned that I was unable to recreate a craft that I found on Pinterest. I also mentioned that, upon investigation, I learned the problem was that I did not first prime the bottle.

Well, ladies and gentlemen, I remedied that but good.

Today I decided to give it another go, so I grabbed another wine bottle from my collection, some Mod Podge, some paint, and some brushes, and I went at it. The only real question was whether to name this post “Mach 2” or “Wine Bottle: The Remix”…still not completely swayed one way or the other, but I had to use something.

THIS is the answer to my problems!

I didn’t have the matte finish, which I read was a good way to prime glass, but I had the glossy, and I figured it would work just as well. So without researching, I just went ahead and coated it.

The bottle’s clothes are invisible!

One thing I did, just to make sure I wasn’t about to waste a lot of time on something that wouldn’t work at all, was I painted just the neck of the bottle to test it out.

Just like it looked before…

I would still need a second, and maybe even third coat, but it was coating much more evenly, so I saw this as a sign to move forward.

As you can see, I went with a different color choice here. I decided to use my TARDIS blue for good luck (yeah, I guess I should update on that soonish, too). It came out nice – the color really pops.

You might say this technique was true blue?

I don’t have chalkboard paint or twine, so I made my own little twist for the finish touches. I used a green, shimmery ribbon (one that I used on my pincushion) and green paint to create the writing box. Then I just painted words on. If I decide I don’t like them later, I can paint over it!

The wine glass was the special touch

So I think the end result was an improvement for sure. Now I’m just not sure how to use this – a flower vase, perhaps? Or, if I bought a funnel, I could keep drinks in it for when we have guests – be them alcoholic or not.